The Perfect Chess Set Up

Posted in Chess, Design, Gadgets, Games, Lifestyle with tags , , , , on 12/13/2023 by Baghead Kelly

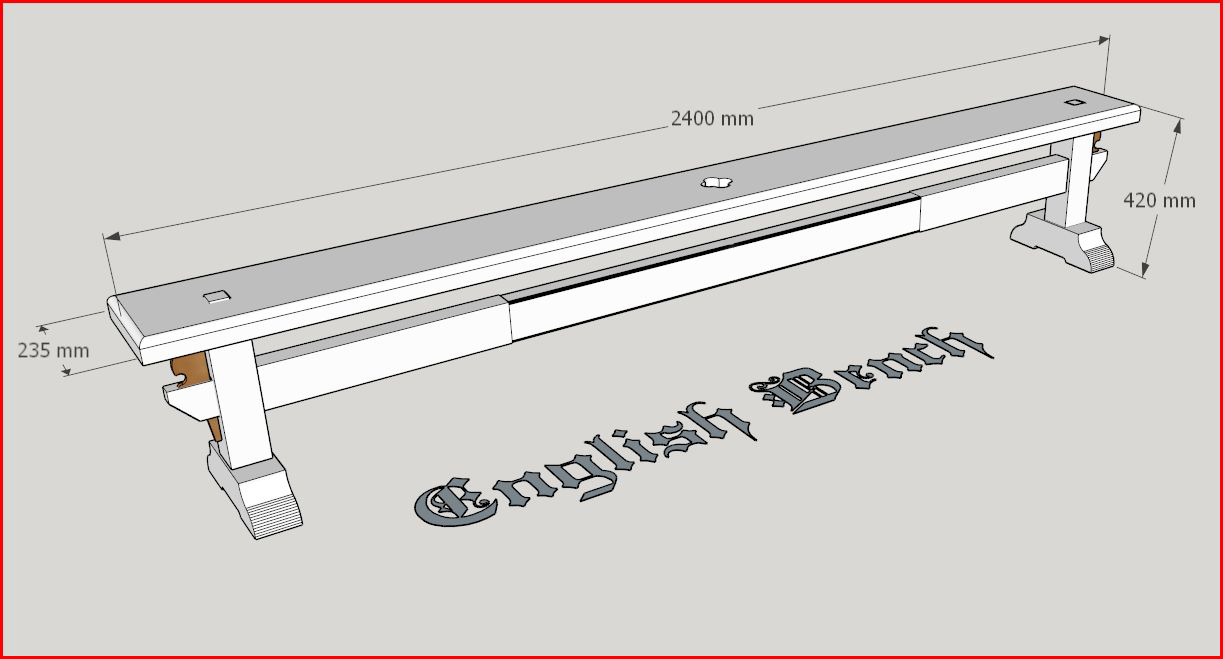
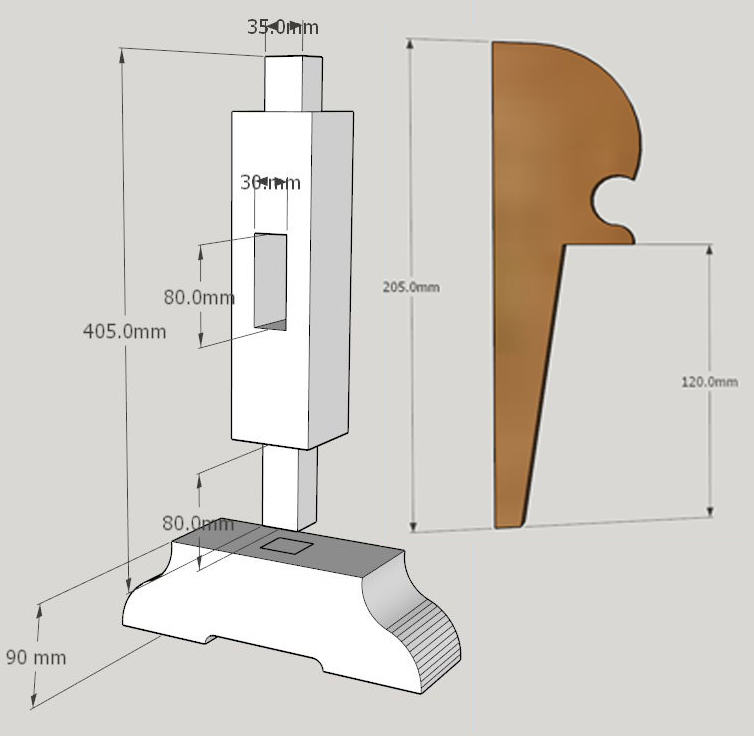
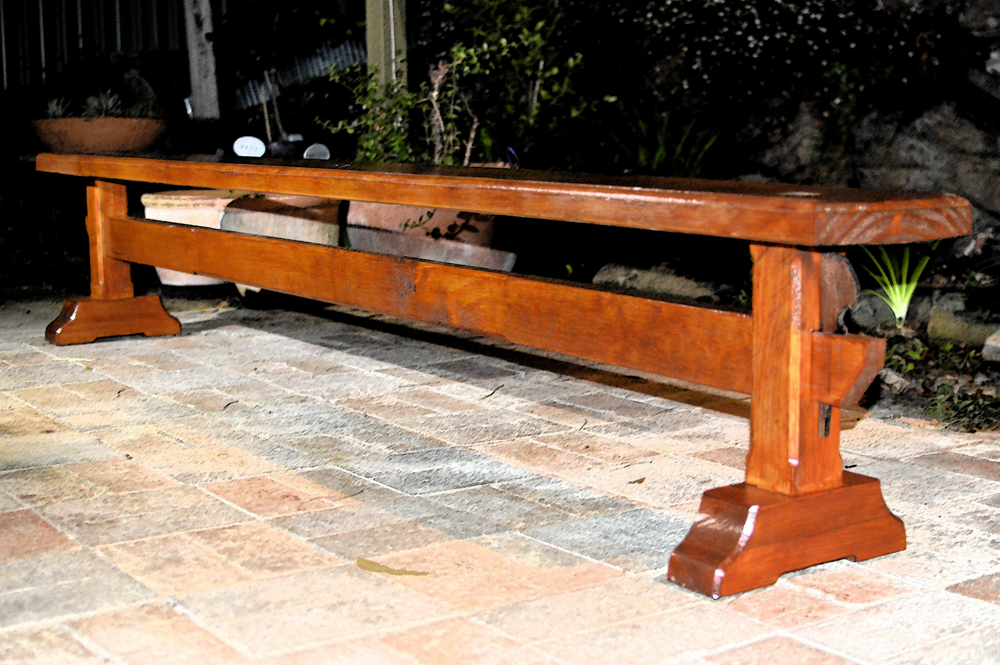
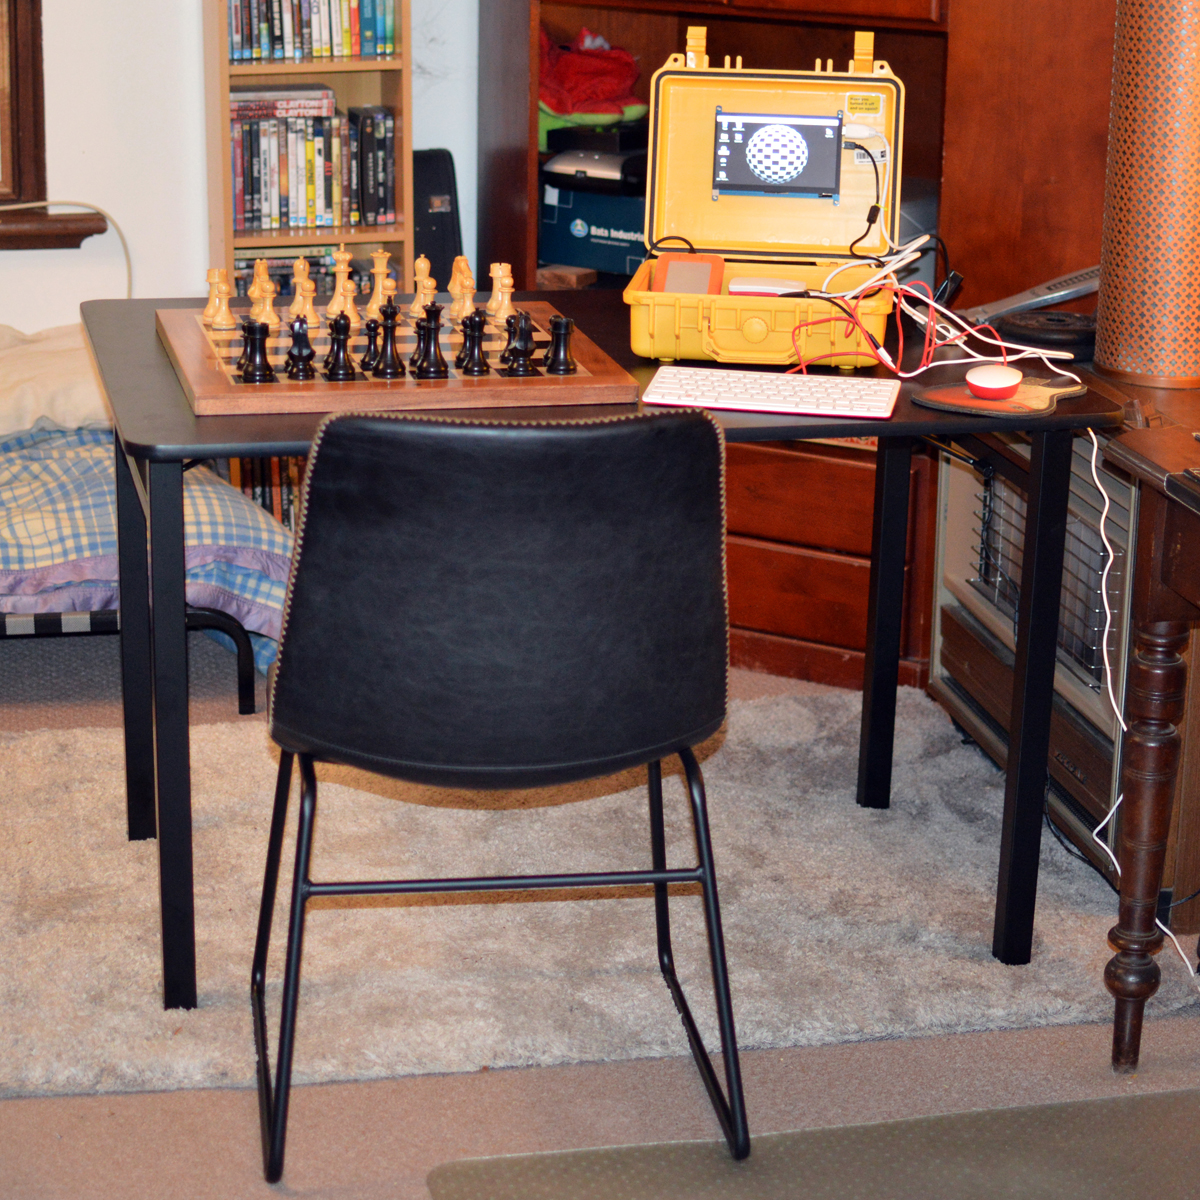
A while ago I wrote about the perfect chess table. At the time I was fired up over the idea of the perfect chess nook, which all stemmed from a photo I found on the internet of a castle window, flanked by two stone, nubs where two people could sit opposite each other, in intimate reflection. It was all very romantic and seemed like a great place to have a quiet game of chess. One thing led to another and I went through an imaginative, phase of ‘Star Trek’ doors and pneumatically controlled table heights, only to be brought back down to Earth with the stark reality of my actual circumstances. I lived in a very small house with three people and a dog – a dedicated spot for chess was not really practical. The eventual, compromise is the photo above, the key being the sturdy little trestle table that I can easily set up and or knock down and store. I had a local company make the table for me using the FIDE recommendations for competition tables as per the photo below;

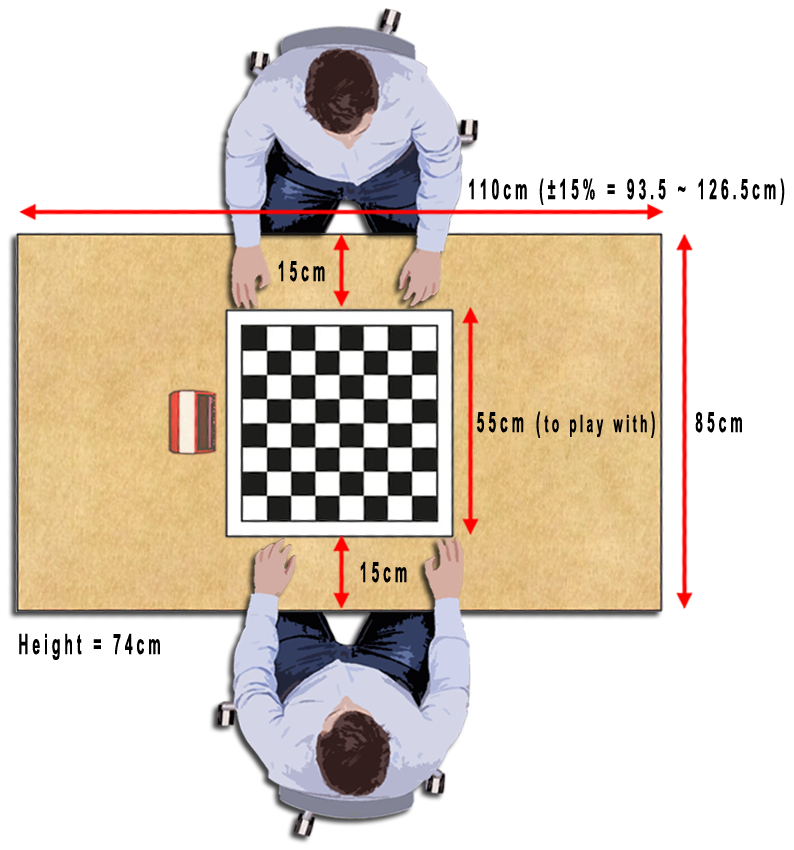
At the end of the process, I would have to say FIDE got it right, the table is a perfect size, and for me there is enough room for all my bits and pieces. The FIDE rule book is fairly lenient when it comes to equipment specifications, because they want to be inclusive; their motto ; “Gens una sumus” translates to “we are one family.” Although I’m not a competitive chess player I like the table and I like the FIDE chess set and through this process I have refined my criteria, for a chess nook, albeit a temporary version;

  1. a nice chess set
  2. adjustable lighting
  3. comfortable seats
  4. internet and power

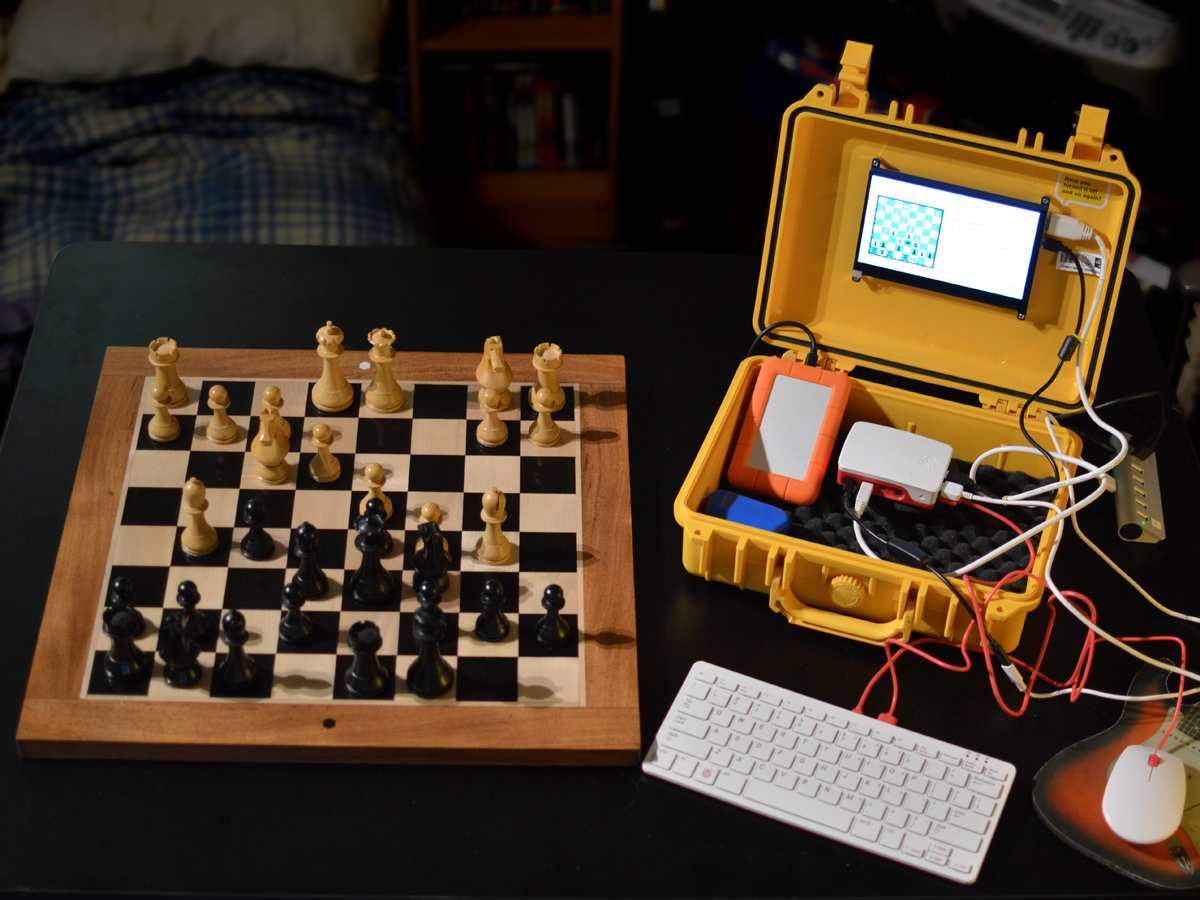
As for the rest of my set up for those that are interested its just a Raspberry Pi 4B set up as a PC. The Debian OS came loaded with several chess apps which I use to play against, moving the pieces manually. I like the feel of a real chess board, I also find it easier to think things through. If I only play part of a game the games boot up again exactly where I left off which is also handy.

Overall I have enjoyed the process of creating the perfect nook and even now I collect photos of other peoples set ups with great interest. There are some great chess set ups out there, especially for people interested in chess computers, some of which automates chess notation and online play. In my case that’s cost prohibitive but I enjoy observing what people come up with next, and quite possibly within my lifetime the economies of scale will make it a possibility for me too.

How cool would it be to play chess against a life sized replica of the ‘Terminator’!

A Chessnut Of An Idea

Posted in Music with tags , , , on 08/04/2022 by Baghead Kelly

In a perfect world I would like to have a floating table dedicated to chess. The above dimensions would leave enough room for each player to rest their elbows on the table (500mm x 500mm board). Plus there would be enough room for a chess clock and a laptop. A power outlet and internet connection would then have to be accessible as would overhead lighting, dimmable of course. Add to this day dream a pair of comfortable office chairs with wheels and tilt adjustment and I would be in chess nirvana.

The floating concept would allow you to roll in and out easily and facilitate cleaning. A possible engineering solution would be to have another smaller table on the other side of the wall concealing a pair of gussets. This would provide the necessary strength for both tables to enable the illusion. If the gusset table was used as a computer table then both sides could be fed power and internet facilities.

The Goldylock’s Thermometer

Posted in Music with tags , , , , , , , , , , on 09/04/2021 by Baghead Kelly

The ‘Goldylock’s’ thermometer uses a traffic light system to monitor the temperature. It is a simple program that uses the Jaycar XC4520 module to track the temperature in Celsius. Conditional statements output the three LED’s depending on the sensor reading. The serial monitor prints the data and includes a statement from Goldie. Another aspect of this code is that it doesn’t need a library and believe me that’s a good thing.

SHOPPING LIST

1 x Arduino Uno or equivalent

1 x XC4520 temperature module (Keyes K853518)

3 x LED’s (I used 5mm)

3 x 220 ohm resistors (or there abouts)

9 x jumper leads

THE PINOUT

THE CODE

// Goldylocks Thermometer Jaycar XC4494 temperature module

#define sensorPin  A0

#define greenLED 2

#define yellowLED 3

#define redLED 4

void setup()

{

  pinMode(greenLED, OUTPUT);

  pinMode(yellowLED, OUTPUT);

  pinMode(redLED, OUTPUT);

  Serial.begin(9600);

}

void loop()

{

  int reading = analogRead(sensorPin);

  float voltage = reading * 5.0;

  voltage /= 1023.0;

  float temperatureC = (voltage – 0.5) * 10 ;

  Serial.print(temperatureC); Serial.print(“° C “);

  if (temperatureC >= 26) {

    digitalWrite(greenLED, LOW);

    digitalWrite(yellowLED, LOW);

    digitalWrite(redLED, HIGH);

    Serial.println(” Goldylocks says ‘It’s Too Hot’.”);

  }

  else if (temperatureC >= 20 && temperatureC < 26) {

    digitalWrite(greenLED, LOW);

    digitalWrite(yellowLED, HIGH);

    digitalWrite(redLED, LOW);

    Serial.println(” Goldylocks says ‘It’s Just Right’.”);

  }

  else {

    digitalWrite(greenLED, HIGH);

    digitalWrite(yellowLED, LOW);

    digitalWrite(redLED, LOW);

    Serial.println(” Goldylocks says ‘It’s Too Cold’.”);

  }

  delay(1000);

}

NOTES

The parameters can be changed in the code to anything you want, I just thought that this was ‘just right’.

Have fun….

Setting Up A Dartboard

Posted in Music with tags , , , , on 10/26/2020 by Baghead Kelly

After mounting your dartboard with the centre of the bullseye 173 cm from the ground, drop a plumb line from the front face of the dartboard (centre of the bullseye) to the ground. Mark the spot and run a perpendicular distance of 237 cm from it. This will be where you place your oche line. If you use a ‘raised’ oche the rules in Australia are that it should be 25mm high by 1 metre wide.

Travel Gaming

Posted in Gadgets, Games, Lifestyle, Travel with tags , , , , , on 08/24/2016 by Baghead Kelly

Travel Kit


  • Set of dice
  • Playing card deck
  • Notepad
  • Pencil

With a little knowledge these four simple items open up a world of games. Dice have been around for thousands of years whilst playing cards are only a mere eleven hundred years old. They have survived through to this modern era of computer games simply because we find them amusing. Beyond that we like them because of their social aspect. They make conversation easy.

If you take the time to learn some games or expand on the ones that you already know you will have a repertoire that you can pull out at any time. Missed your flight? Stuck in the emergency department? Not yet out on bail? Then perhaps a game of craps is in order or even strip poker. Maybe the grandkids are over and you can play Beetle or Old Maid. The choices are as many as you can memorize and teach.

The real trick here however, is in keeping it all compact. You can buy ‘Bridge’ sized playing cards which are generally a quarter of an inch smaller in width and die usually come in 10, 14 and 16mm sizes. The 10mm die are still a good size to play with, as are the ‘Bridge’ sized cards. Once you’ve sorted those items out and sized matched them with a pad and pencil you can start looking for a suitably sized tin or Tupperware container. Good luck with that.

My personal favorites dice games are ‘Pig’ and ‘Ship, Captain. Crew’ whilst I like Conquian and Euchre card games. I’m slowly learning new games and testing them out on my family; some work and some don’t. When they’ve had enough there is always time to fit in a couple of hands of ‘Solitaire’.

English Benchwarmer

Posted in Art, Carpentry, D.I.Y., Design, Home Renovations, Lifestyle with tags , , , on 08/05/2016 by Baghead Kelly

Bench Warmer

I have a materials rack in my workshop which was filled beyond capacity and so it was about time to use up some of my hoardings. Essentially I had a pine plank which was 2.4 meters long and some dunnage/bearers that I had scabbed from jobsite skip bins.

What do you do with a plank?……… well you make a bench of course!

Now I wanted to make a knockdown bench so I could pack it up if I had to. Thus I used two wedges to hold it all together ( 9° from plumb and 8mm thick, hardwood is advisable). No nails, or screws. I used ‘ Sketchup Make’ to draw up the plans above. The components are essentially;

  • the plank
  • the cross brace
  • The legs x 2
  • The wedges x 2

It was all fairly straight forward but the hardest part was manufacturing the two legs. The feet were made from two pieces of 90mm x 45mm stud glued together so I could band saw the ogee shape and cut the 10mm groove out of the bottom. Then the uprights had a mortise and tenon carved top and bottom to house the feet which were glued and the bench which is dry fitted. I was worried about the dry fitting at the plank end for stability but in retrospect the mortice and tenon works great. However if you lift the bench by the plank it will come off – you have to lift it by the mid rail, which I can do easily by myself. If you’re worried about this you might think about a dowel to pin it on or glue it permanently.

Benchwarmer combined

The other modification I would incorporate would be to shorten the plank to 1800mm to reduce the span. Due to the detail that I’ve drilled into the centre of the plank there is a weakness right in the middle. Now I can sit on ‘Ye Ole Benchwarmer’ with my wife and six foot four son no worries but I don’t think we would be doing it across an infinite abyss. Plus I like the little detail of a cross cut with a hole saw and routered with an ogee to fancy it up – a little design feature I nicked from a church pew. The cross brace was also chamfered with a router in the middle to add a little old world charm as were the uprights and feet.

This was a fun project and I use it to put my toolboxes on, which leaves them on a convenient height to rummage through. So if your interested in a plank with legs, I’d recommend making the two legs first, followed by the cross brace and  leaving the mortises in the plank till last.

Any queries, I’ll try to help.  Cheerio Ladies and Gents!

Bench Warmer 4 pos


My God I’m A Bird Spotter!

Posted in Music with tags , , , , , on 04/11/2016 by Baghead Kelly

My Garden

One of my favourite movies is called “Birdy”, starring a very young, Matthew Modine and Nicolas Cage. It is the story of childhood friends of disparate backgrounds who go to Vietnam where the Nicolas Cage character is traumatized by his experiences and regresses to a near comatose state. Mathew Modine is brought in to coax Cage back into the real world using memories of their childhood. Directed by Alan Parker it is an unusual and powerful story. Anyway I would highly recommend this movie to anyone who hasn’t seen it.

The point of this reference is that from this movie I developed a love of birds and ornithopters. I have three cockateels as pets. I used to have zebra finches but they bred so profusely that I set them free. I wasn’t sure about this as I’d heard stories about tame birds not surviving in the real world. As a precaution I bought a chook feeder which I hung from a tree in my back yard and continued to feed my little buds. At first they would come every day, then it was once a week and sometimes they would disappear for awhile but always come back.

The seed I use now is a wild bird mix that contains different sized seed. Every weekend my wife and I would fill the feeder and first would come the Sulphur Crested Cockatoos, the largest of the visitors, followed by the Galahs, the Rainbow Lorikeets, the Adelaide Rosella’s and finally my little marauding gang of Zebra Finches.

Essentially the larger birds eat the larger seeds until only the small seed is left for the small birds. Both a pecking order and a sorting process. Like myself the koala watches over the proceedings and we both think it is a hoot. Better than television.

Making A Roadcase

Posted in Carpentry, Design, Gadgets, Home Studio, Lifestyle, Music with tags , , , , on 03/24/2016 by Baghead Kelly

Road Case Blog

Roadcases are fun little projects to encase and protect your precious electronics. This is the second one that I’ve built and I’ve enjoyed both of those endeavours. My old one became superfluous after I blew up the amp (I have a habit of doing that) and as these projects are bespoke by nature, it was time to update.

I’ve had this Yamaha EMX 512SC for a few years now and I cannot speak more highly of it. It has a great sound with lots of bottom end when paired with my A15 speakers. The big surprise for me though was the cheap arsed Chinese DMX lighting controller that you see on the top. My lighting system consists of this unit and 10 x ADJ Mega Par Profile plus a couple of laser lights. DMX is 80’s technology which basically is a standard for lighting systems. I didn’t know much about it but today you can buy these units very cheaply from your electronics store and they are very versatile. Paired with DMX standard lighting you can change the colours, intensity, focus and direction of your lighting. It depends on the light what you can do with it but with the controller you can also program lighting shows to match a song or play.

Anyway these two units complemented each other perfectly and so it was a natural progression to pair them into one unit. This way I had only one power point to plug in plus two speaker cables and one DMX cable daisy chained to the lights. An easy set up.

I had to also include an electronic fan and venting to ensure that the P.A. was happy with access to the reset on the ELCB within the unit. It is quite heavy for the size of the unit and so I added the wheels. The trick with wheels is to have two fixed wheels and two lockable, swivel wheels to steer with. I incorporated a lockable drawer and a shelf to stash the microphones cables and torch.

I used ¾” construction ply for the construction which used to be 19mm but seems to have been downsized to 17mm these days. The last time I built one of these I added corner protectors which you can get in plastic or metal but this time I didn’t feel the need.

The last tip that I can impart on this project was that I got an RCA to 1/8” jack so that the kids could use the play lists on there cell phones and run them through the P.A. It worked a treat so long as they didn’t play around with the phones whilst songs were playing. You can get some pretty harsh sounds with any loose connections.

Party Lights

Making a Lagerphone

Posted in Carpentry, Design, Free, Gadgets, Home Studio, Humor, Lifestyle, Music with tags , , on 03/15/2016 by Baghead Kelly


I’d always harboured a desire to make a lagerphone and finally I’ve ticked it off of my bucket list. A lagerphone is essentially a tambourine type of instrument made from a broomstick and crown capped bottle tops. From the Idiophone family it is mainly used in folk music and is known by many names from many different cultures.

The first task was collecting the bottle tops, which required much merriment and the sampling of various types of lager which had different coloured bottle tops. I was clearly the right man for the job.

Another pre-requisite was my penchant for hoarding. During renovations I kept one of our old curtain rods, which was about an inch and a quarter diameter (32mm). It also featured a finial which with a nose added became the ‘Noddy’ head. In my research I discovered that it was commonplace to place a boot at the bottom to protect a venues flooring. It so happened that I’d kept one of my fifteen year old’s boots from when he was a toddler. Actually we kept all of them.

The next stage was punching holes in the bottle tops. For this task I used an off-cut from one of our veranda posts, which I had drawn diagonal lines from corner to corner and drilled a 5/16” (8mm) hole in the centre where the lines bisected. With a nail punch I could then line my bottle top up over the hole using the diagonal lines and with one tap I could punch a hole in the centre. The jig worked quite well although I had to manually pull off the bit off metal still left hanging.

Next I space out where I wanted the bottle tops which was basically a north/south/east/west pattern. I carefully drilled them and bought some screws with a clean shank to affix each set of twin bottle tops.

Additionally I placed a mint tin containing ball bearings into the boot which was simply screwed to the curtain rod between the tread of the boot. I used a bit of plumbing pipe insulation for the handle and the sock of the boot. Also on the large beer can at the top I placed a nut suspended from a bit of wire to act as a clapper.

I thoroughly enjoyed the process and the thought of terrorising my clan gatherings with my new lagerphone fills me with wicked glee. So if your interested in making a lagerphone here are a few name variations to Google as the various designs are as different and wild as your imagination.

a.k.a.

  • Boozaphone,
  • Mendoza/mendozer,
  • Monkey stick,
  • Murrumbidgee River Rattler
  • Teufelsgeige
  • Jingling Johnie
  • Stumpfidel
  • Ugly Stick

The Inheritance

Posted in Art, Carpentry, Design, Family, History, Home Renovations, Humor, Lifestyle with tags , on 02/10/2016 by Baghead Kelly

JKS Toolbox

A few years back my father gave me, my grandfather’s toolbox, as seen in the photo above. I was chuffed, it was full of tools both old and new. Indeed as a youngster I well remember the odd occasion whilst in my grandfather’s care we would ‘stooge about’ at his workbench. My favourite memory, is when he showed me how to make hot air balloons that floated up to the rafters in his loft. At other times we would make secret compartments in his house. He was big on secret compartments. One in particular I wondered if after he died whether anybody knew of its existence except me. I guess I’ll never know. Anyways my memories of this toolbox were fond ones and it reminds me of a time that was happy and carefree.

Still that was an era when my grandad owned the toolbox and now it belongs to me. The first act of sacrilege that I committed was when I removed the contemporary tools that were contained within and replaced them with the antique tools that I had collected over the years. All of a sudden, Voilá, it was transformed from a toolkit from a bygone era into a mini museum.

The second act of vandalism was when I decided to paint a mural on the front. I had the idea of painting an English pub type sign with sawyers in a sawpit. When I started searching for photographs to base my design, I came across, a book called; “The Book of Trades or Library of the Useful Arts” from 1805. Volume 1, page 68 contained a magnificent illustration of “A Sawyer”, which I duly lifted for my own purposes.

Interestingly enough, the said book was a vocational guide for young people to compare occupations and indeed such publications dated at least 200 years prior to this one. Reminding me of my recent encounter with my sons teachers who seem to want to pigeon hole him into some dead end career at the age of fifteen. The difference being at the earlier time 11 or 12 was probably more appropriate an age to begin your working life but I digress.

Having finished the mural I have concluded that I ain’t much of an artist but one day my son will inherit his great grandfathers toolbox and he will be free to do with it whatever takes his fancy. At this point however just trying to entice him from his virtual reality to stooge about with his Dad is proving to be a new challenge in itself.

Finnished